After talking about decoupling units at the linker level in part 2, this last part of the series is going to be about achieving the same goal, but at the preprocessing stage of the build process. At the end of the article, you will find a comparison of all three methods.
Note: This is a series of three articles. You can find the other ones here: Part 2, Part 3.
Let’s start with another quote from Michael Feathers. In Working Effectively with Legacy Code, he tells us about yet another type of seams:
Only a couple of languages have a build stage before compilation. C and C++ are the most common of them. […] I’m actually glad that C and C++ have a preprocessor because the preprocessor gives us more seams.
That stage before compilation, the preprocessing, is what we interested in during the course of this article.
How to get from .c to .o
So, before passing source code on to the compiler, C and C++ employ a preprocessing stage. During this phase, the preprocessor fulfills some basic tasks – with its output still being valid C or C++ code. This output is called preprocessed source code, according to the preprocessor docs of the GNU project.
The diagram below shows the two steps involved in converting a C source file into an object file: preprocessing and compiling.
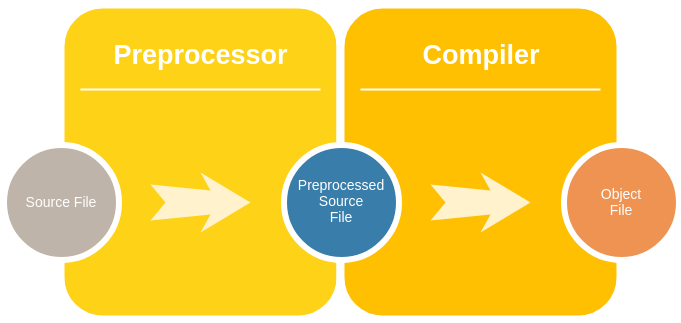
Tip: To inspect the preprocessed source file, you can use gcc -E foo.c. This will skip the compile step and print the preprocessor result right to the terminal.
The Preprocessor Produces Units
For the matter of decoupling units, we may utilize the preprocessed source file.
In fact, there’s another way to look at it: The preprocessor generates different instances of the same source file for each configuration we wish to have, before they are passed on to the compiler:
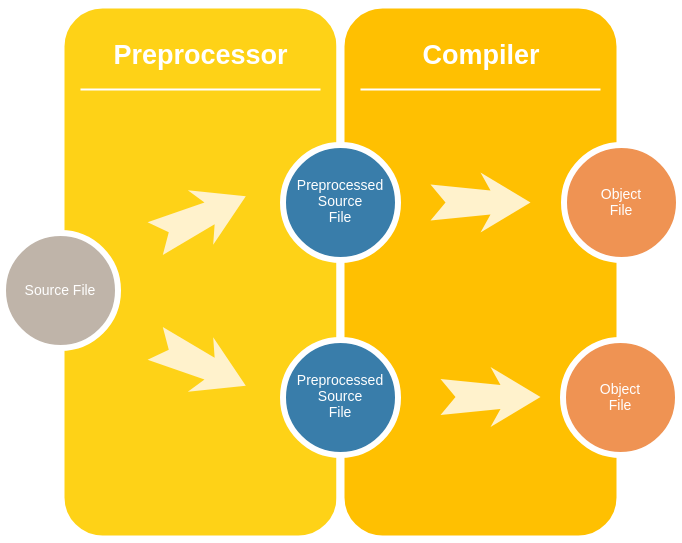
Having several instances is a great achievement already. To make each instance somewhat unique, we will now introduce parameters. We may even, in Object-Oriented terms, think of source files as classes. Each preprocessed file can then be modeled as an instance of that class, i.e. as an object.
Let’s say we define a class SourceFile that has a config attribute. Then, the preprocessed files can be modeled as objects of that type, parameterized by the specific value of the config attribute:
| Object | Type | Value of config |
| Preprocessed Production File | SourceFile | PRODUCTION |
| Preprocessed Test File | SourceFile | TEST |
A Practical Example
In practice, there are no such classes of course. So let’s see how you would do that in a Makefile:
CONFIG_PRODUCTION = 0
CONFIG_TEST = 1

driver.o: driver.c driver.h
  gcc -c driver.c -o driver.o

foo_production: foo.c driver.o
  gcc -DCONFIG=$(CONFIG_PRODUCTION) foo.c driver.o -o foo_production

foo_test: foo.c driver.o
  gcc -DCONFIG=$(CONFIG_TEST) foo.c driver.o -o foo_test
The first thing being built is the driver. It is the same for both configurations. For each of the build configurations, there is a corresponding foo_ target. You will notice that the same source file (foo.c) is used for both of these. This is intentional, as we
want the preprocessor to modify them right before compilation.
Here, the value of the config attribute (now the CONFIG macro) is determined by the -D flag passed to the compiler. You would then put some extra preprocessor statements into the code:
// foo.c

#include "driver.h"

#define CONFIG_PRODUCTION 0
#define CONFIG_TEST 1

int main(void) {
#if CONFIG == CONFIG_PRODUCTION
  driver_doA();
#elif CONFIG == CONFIG_TEST
  driver_doB();
#else
#error "Invalid CONFIG!"
#endif
}
That way, the preprocessor effectively switches between two code blocks, depending on how it is called by the Makefile.
Tip: Inspect the preprocessed files to watch how the code is actually swapped!
That’s probably all we need in order to accomplish our goal: software units, decoupled from each other using the preprocessor.
This approach has the obvious drawback that your code gets cluttered with ifdefs. Compared to link time decoupling (part 2) though, the compiler can probably do a better job optimizing, as you don’t need to separate code into different compile units (c files) for this to work.
Overall Comparison
That’s it for the three parts of the series of articles. What’s left is the big picture.
Tool Support
In my experience, tool support for both the link and preprocessor approach is somewhat better than for decoupling on the object level. Jumping to function definition as well as single stepping in the debugger works seamlessly without an indirection through function pointers. Also, code sections disabled by preprocessor macros are usually highlighted accordingly by IDEs.
Now that I’m thinking about it: Do you know of an IDE that supports following function pointers the way you want it? Do not hesitate to get in touch with me via Twitter!
No need to Re-build
Before doing a comparison of all three approaches, I would like to highlight one aspect of the link level method I think is really important:
This is the only approach that allows you to leave your object files untouched. That’s really a great feature if you think about it: no need to re-compile anything when switching from testing to production. There is a perfectly clear separation of internal debugging code and code that’s going to be shipped with the actual product.
Comparison Summary
To sum it up, here’s a comparison of the pros and cons mentioned in part 1 through 3, at a glance.
| Object | Link | Preprocessor | |
| Runtime Performance | - - | - | + |
| Tool Support | - | ++ | ++ |
| Runtime Flexibility | + | - | - |
| UML Modelling | ++ | + | - |
| Testability | ++ | ++ | ++ |
| Compile-Time Checking | + | ++ | ++ |
| Readability | + | ++ | - |
These are mostly subjective metrics, of course. It depends on your project’s requirements which method suits you best – it may even be a combination of all three of them.